Quickstart
Set up your first organization, API, resources, and roles end to end.
This guide walks you through setting up your first API on Snaapi, from creating an organization to making your first authenticated API call.
Key concepts
Organization. The top-level container for everything you build on Snaapi. Your team members, APIs, and billing all belong to an organization.
API. A named, deployable API instance. Each API has its own resources, roles, and permissions. You can create multiple APIs within one organization (for example, one per product or environment).
Resource. The core building block of an API. A resource represents a data entity (think of a table) that Snaapi exposes as a fully functional REST API with access control, validation, and event streaming built in.
Field. Defines the shape of a resource. Each field has a name, a type (string, number, boolean, datetime, and others), and optional properties that control validation, sorting, and search behavior.
Role. A named tier of access. Every user or API key is assigned a role.
Common roles include admin, editor, and viewer, though you define the
names and what each one can do.
Permission. Ties a role to an action (create, read, update, or delete) on a specific resource. Permissions control which fields are visible, which records can be accessed, and what values are enforced at write time.
Step 1: Create an organization
After signing up, you will be prompted to create your first organization. Give it a name that reflects your company or team. You can invite additional members from the organization settings at any time.
Step 2: Create an API
From your organization dashboard, select New API. Provide a name and an optional description. Once created, you will land in the API builder where you can start defining your data model.

Step 3: Define your resources
You have two paths. Build resources manually in the UI, or import them from an existing spreadsheet or YAML file.
Option A: Define resources manually
Select New Resource and give it a name (for example, products or
orders). Then add fields one by one. For each field, choose a type and
configure any relevant properties.
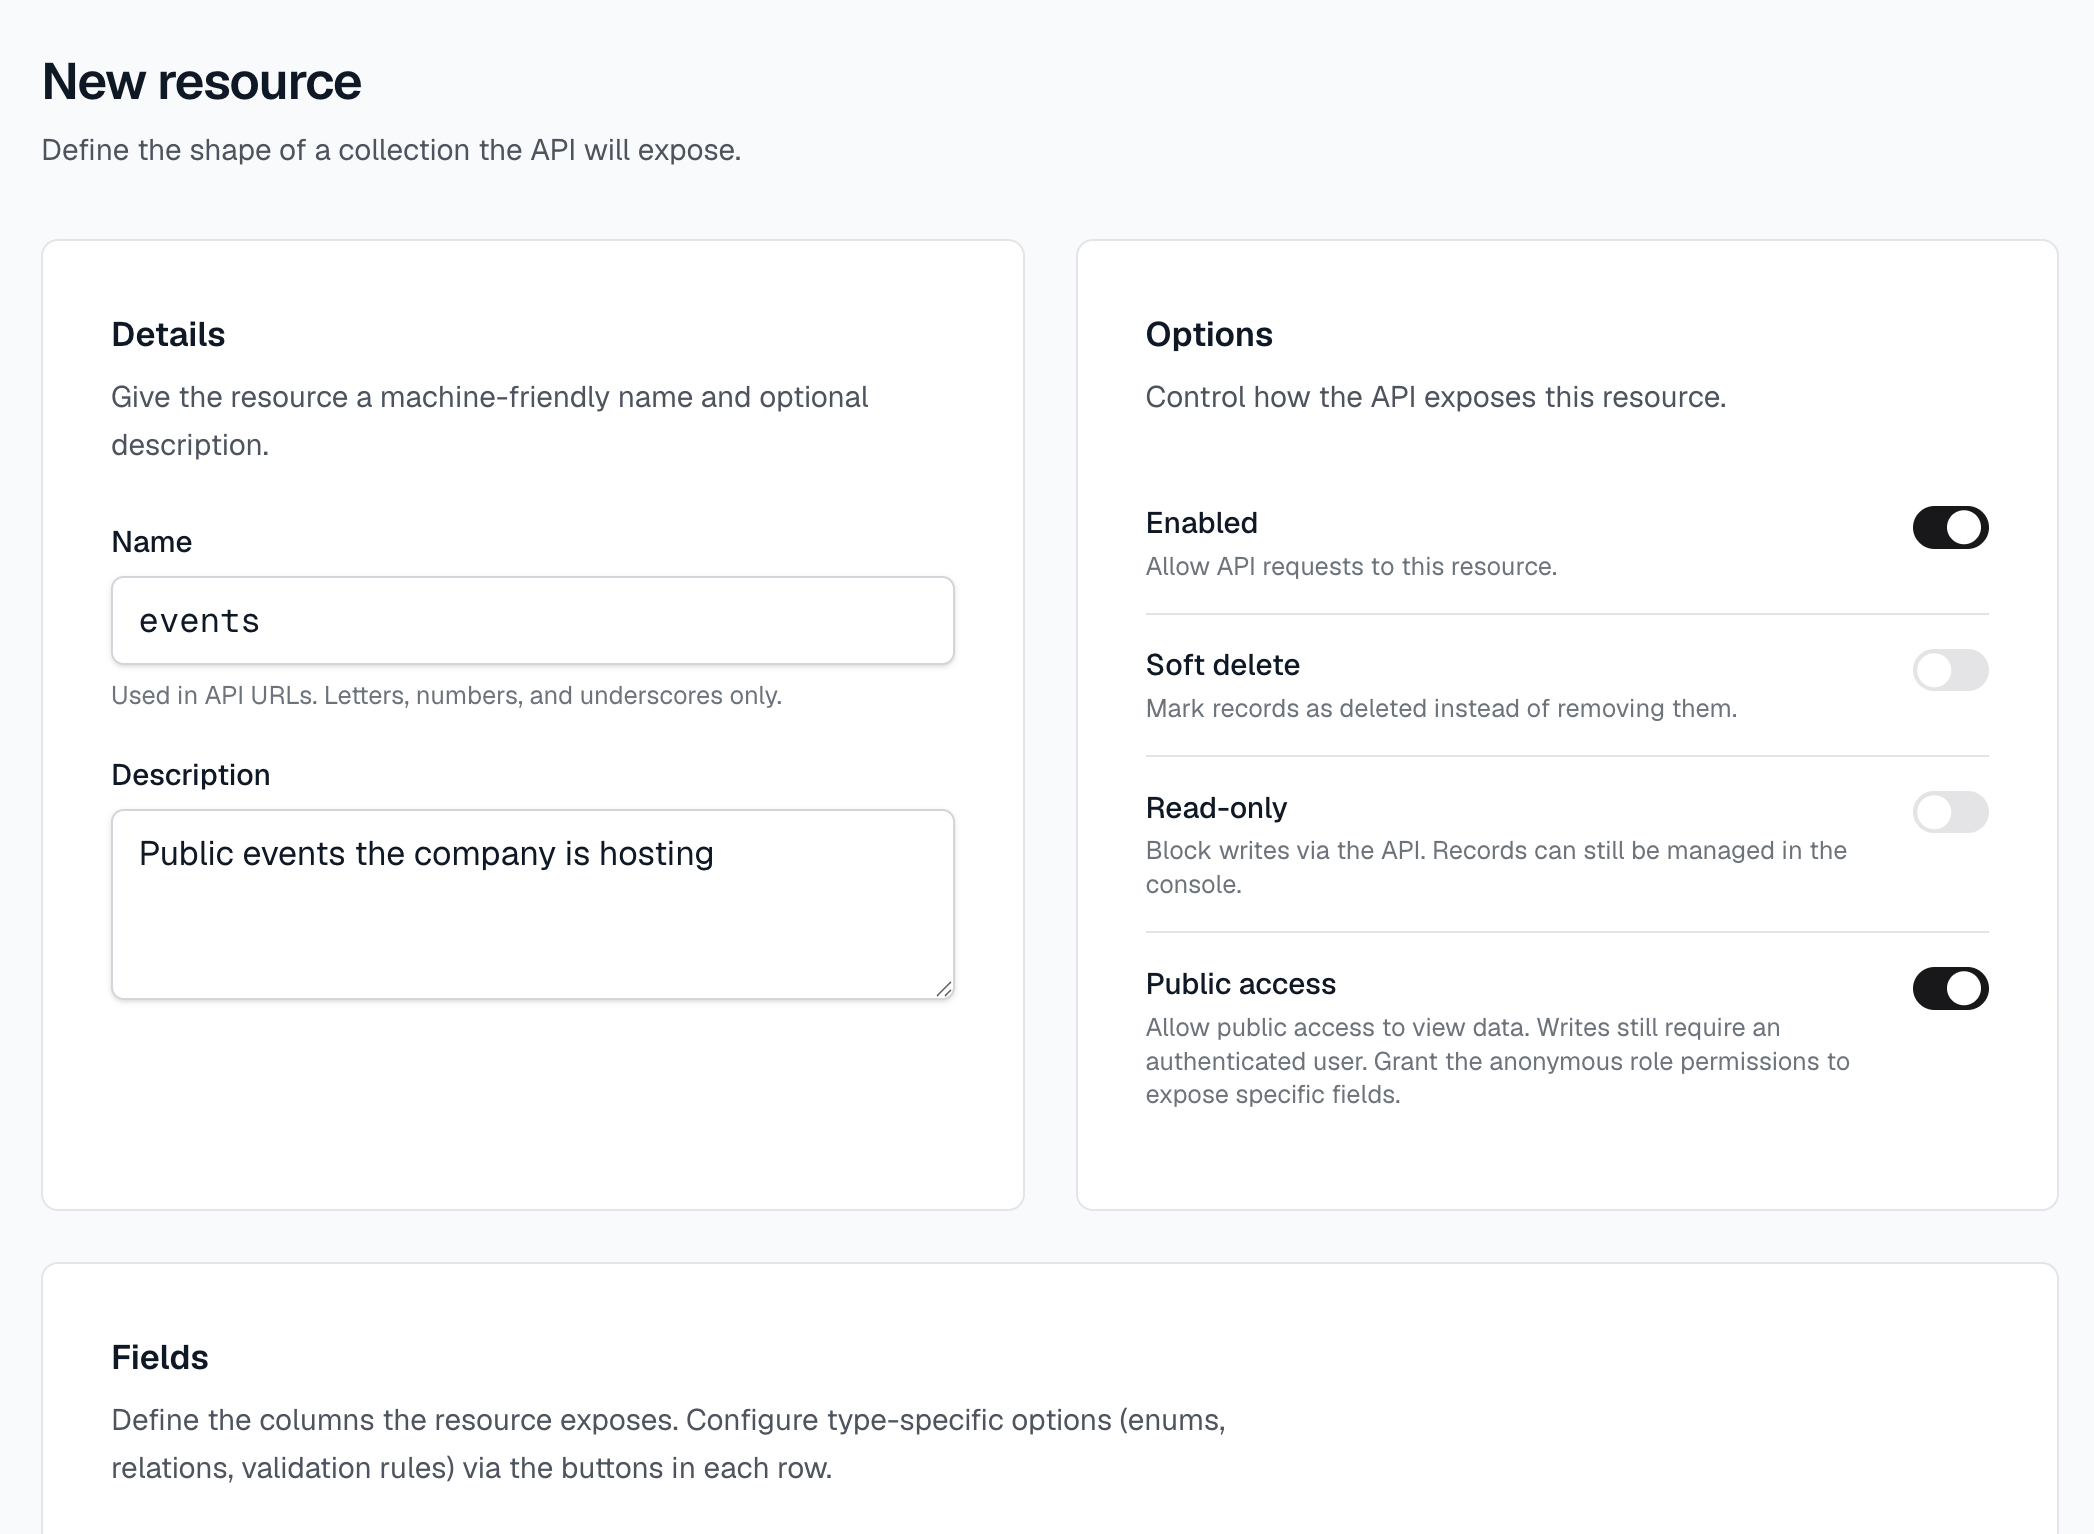
- Mark a field required if it must be present when a record is created.
- Mark a field searchable if you want it included in full-text search.
- Mark a field sortable to allow ordering results by that field.
- Add a description or display name to help teammates understand the field's purpose in generated documentation.
Every resource automatically includes three system fields: id, created_at,
and updated_at. You do not need to add these yourself.
Repeat this process for each resource in your data model. Resources can reference each other through relation fields, allowing you to link records across entities (for example, an order that belongs to a customer).
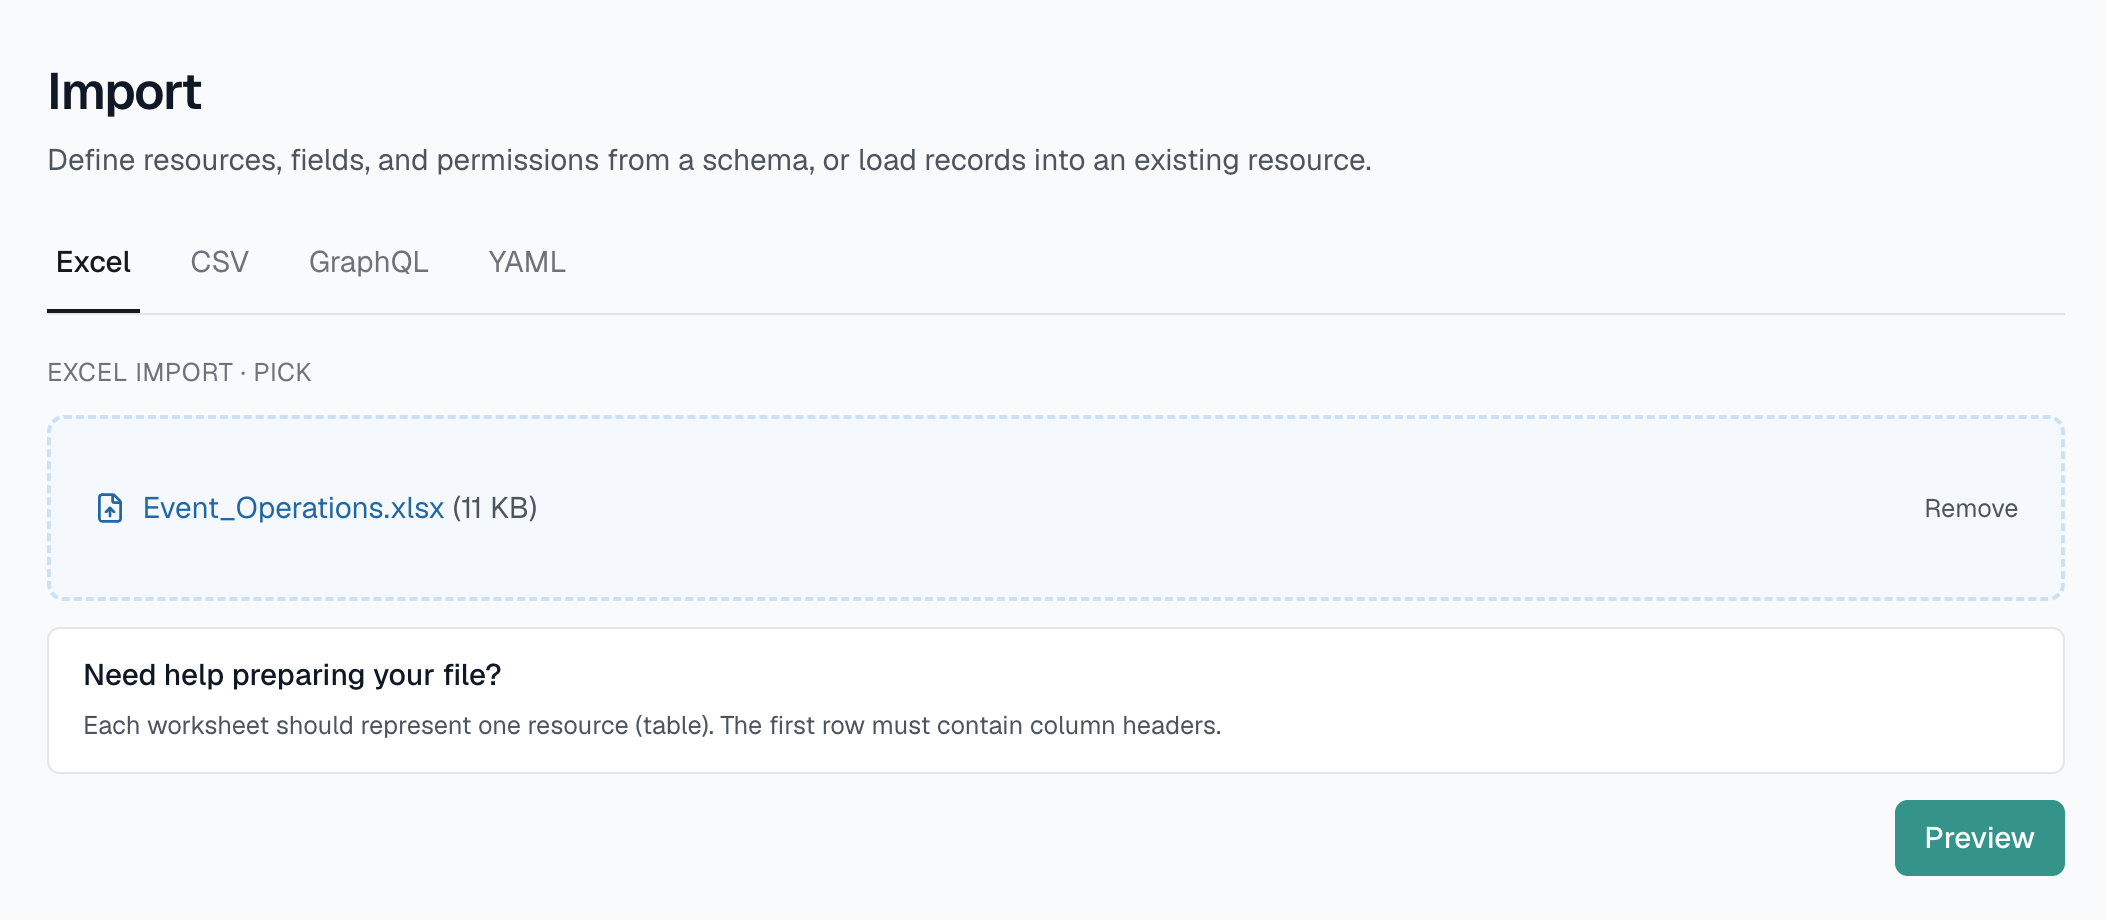
Option B: Import from Excel or CSV
If your data model already lives in a spreadsheet, select Import and upload
an .xlsx or .csv file. Snaapi analyzes your column headers and sample values
to infer field names and types automatically. You will see a preview before
anything is saved. Confirm the import to create the resource and load the data
in one step.
Option C: Import from GraphQL
If you have an existing GraphQL service, you can build your resources from its
schema. Select Import and either upload a .graphql SDL file or supply the
URL of a live GraphQL endpoint to introspect. Snaapi maps the GraphQL types to
resources and fields, and shows a preview before saving.
Option D: Import from YAML
If you have a YAML manifest (from an export or an example project), upload it through the Import tab. YAML imports include resources, fields, roles, permissions, and webhooks. See Import and export for the format.
Preview before importing
Whichever source you use, Snaapi shows a preview of the inferred resources, fields, and types before anything is saved. Adjust names, types, or properties inline, then confirm to create the resources.

Step 4: Add roles and permissions
By default, only admins can access your API. To give other users read access, create a role and configure its permissions.
Select Roles in the sidebar and choose New Role. Name it (for example,
viewer) and save it. Then open the role and add a permission for each resource
you want to expose.

- Choose the resource.
- Choose the action (read).
- Select which fields the role can see. You can expose all fields or restrict to a subset.
Repeat for any additional roles you need. Users assigned the viewer role will
only be able to read the records and fields you have granted access to. See
Permissions for the full three-layer model
(fields, filters, and checks).
Step 5: View the human-readable documentation
Snaapi generates a documentation page for your API automatically, updated whenever you change your resources or fields. To view it, open the Docs tab in the API builder. This page is designed for non-technical stakeholders and internal teams. It describes each resource, its fields, their types, and any descriptions you have added.
By default, the docs page is publicly accessible. You can restrict it to authenticated users from the API settings if your model contains sensitive information.
Step 6: Share the OpenAPI spec with developers
For developers integrating with your API, Snaapi publishes a fully generated OpenAPI 3.1 specification that stays in sync with your resource definitions. Open the API Reference tab to view the spec in the browser, or share the direct URL with your development team.
The spec can be imported into tools like Postman, Insomnia, Redoc, or Swagger UI. Per-resource specs are also available if a developer only needs the schema for a specific endpoint.
Step 7: Make your first API call
From the API Keys tab, create a key and copy it (it is only shown once).
Then call your API with curl.
List records, filtered and sorted:
curl "https://your-api.snaapi.cloud/v1/products?in_stock=true&_sort=-price" \
  -H "Authorization: Bearer sna_YOUR_TOKEN"
The response follows the JSON:API spec:
{
  "data": [
    {
      "type": "products",
      "id": "prod-uuid",
      "attributes": {
        "name": "Charming Colonial",
        "price": 475000,
        "in_stock": true,
        "created_at": "2026-01-15T10:30:00Z"
      }
    }
  ],
  "meta": { "total": 12 },
  "links": {
    "self": "/v1/products?in_stock=true&_sort=-price&page[offset]=0&page[limit]=50"
  }
}
Create a record:
curl -X POST https://your-api.snaapi.cloud/v1/products \
  -H "Content-Type: application/json" \
  -H "Authorization: Bearer sna_YOUR_TOKEN" \
  -d '{ "name": "New Listing", "price": 325000, "in_stock": true }'
Stream real-time events:
curl -N https://your-api.snaapi.cloud/v1/products/stream \
  -H "Authorization: Bearer sna_YOUR_TOKEN"
What is next
With your API defined, your roles configured, and your docs ready to share, you can explore.
- Webhooks. Receive HTTP callbacks when records are created, updated, or deleted.
- Realtime. Stream live changes to connected clients using Server-Sent Events.
- API keys. Generate scoped, rate-limited keys for server-to-server integrations.
- Import and export. Move your entire resource and permission configuration between environments using YAML.